Before starting with Class 7 Science Chapter 10 i.e. ‘Electric Current and its Effects’, I am hoping that you have completed Chapter 9 of the 7th class. If not, then you can go through its Notes and NCERT Exercise Solutions whose links have been provided below. ⤵️
Table of Content
Introduction
In our 6th class, we have learnt about the basics of electricity and circuits in chapter 9. If you want to quickly go through the chapter then the link to its notes is provided below:
In that chapter, we have learned to make circuits and then draw up those circuits in our notebooks. For example,
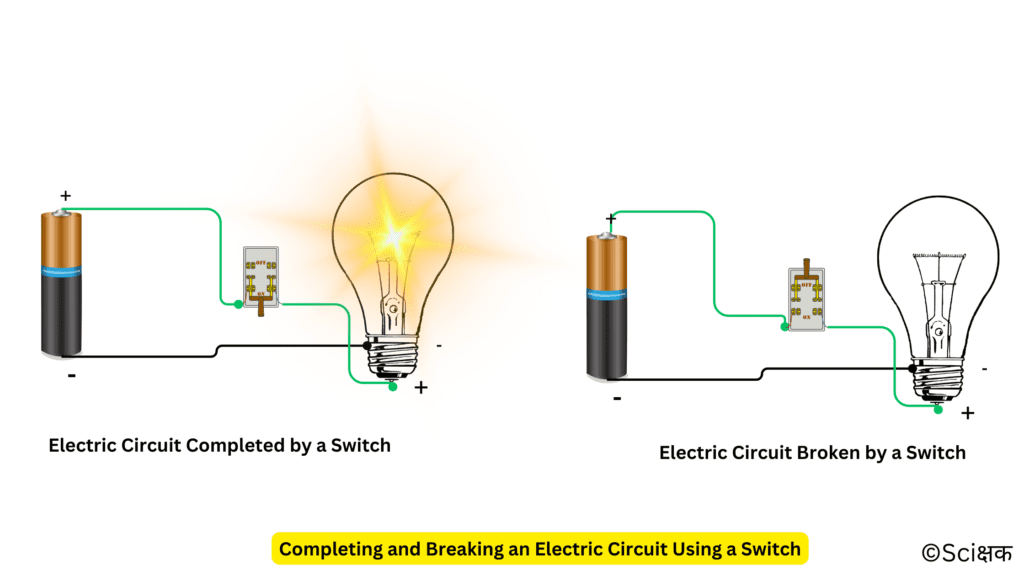
However, it is not always convenient to draw each component of a circuit in detail. We need an easier way of representing those electrical components.
Well, this is what we are going to learn about today.
Symbols of Electric Components
For convenience, we use the symbols of electric components to draw a circuit diagram rather than the electric components itself. Drawing and understanding the symbols is quite easy.
SYMBOLS OF SOME OF THE COMMON ELECTRIC COMPONENTS:
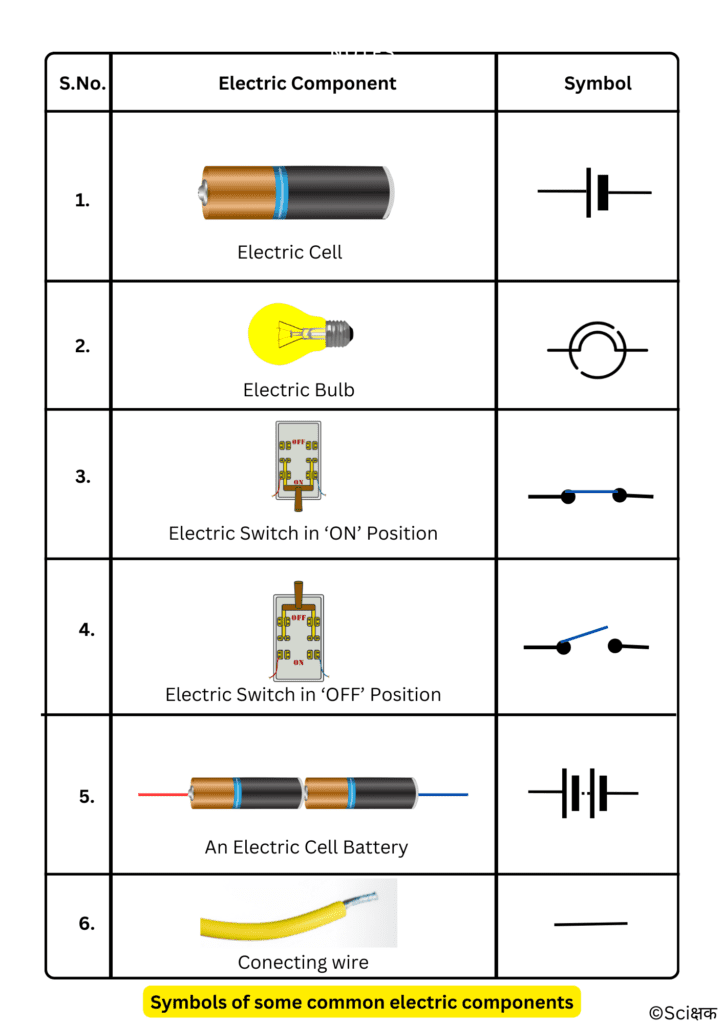
SYMBOL OF AN ELECTRIC CELL:

- It has one longer line (positive terminal)
- And, one shorter but thicker line (negative terminal).
A Battery
We need more than one cell for some of our appliances and activities, so we connect two or more cells together forming a battery.

So, a battery is a combination of two or more electric cells.
How to connect cells to make a battery?
The positive terminal of one cell is connected to the negative terminal of the next cell and so on.
There are various devices i.e. TV remote, transistors, toys, etc. which are powered by an electric battery. But, in those devices, the cells are not placed one after the other but they are placed side by side.
So, how do cells placed side by side form a battery?
In the batteries where the cells are placed side by side, there is usually a thick wire or a metallic strip connecting the positive terminal of one cell to the negative terminal of the next cell.
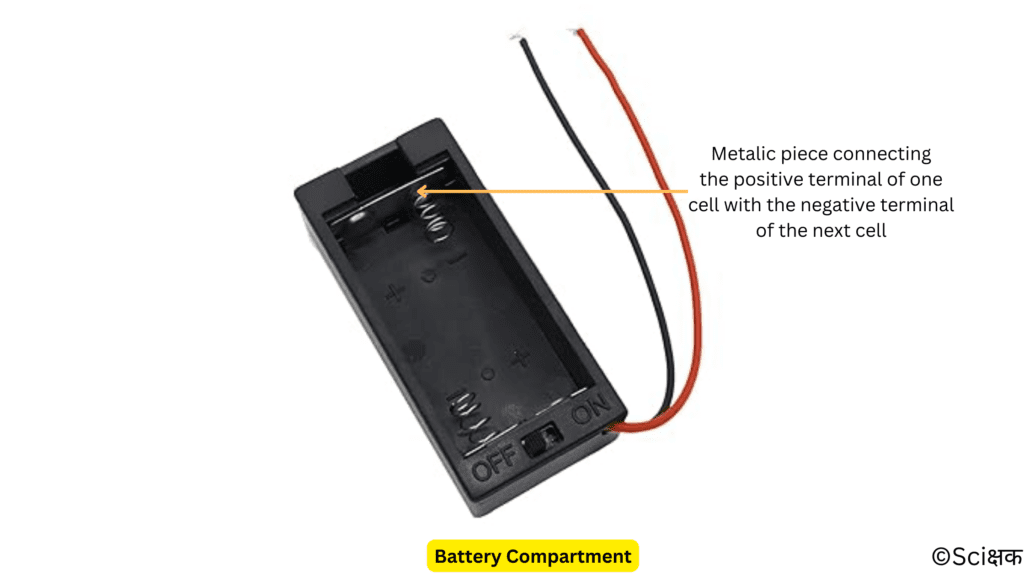
So, in order to help us correctly place the cells in the battery compartment ‘+’ and ‘-‘ symbols are usually printed there.
You can also make your battery by using some rubberbands, wooden blocks, iron strips, etc.
Drawing Electric Circuit Using The Symbols
Let’s try to draw a circuit diagram using the symbols of the circuit provided in the introduction section.
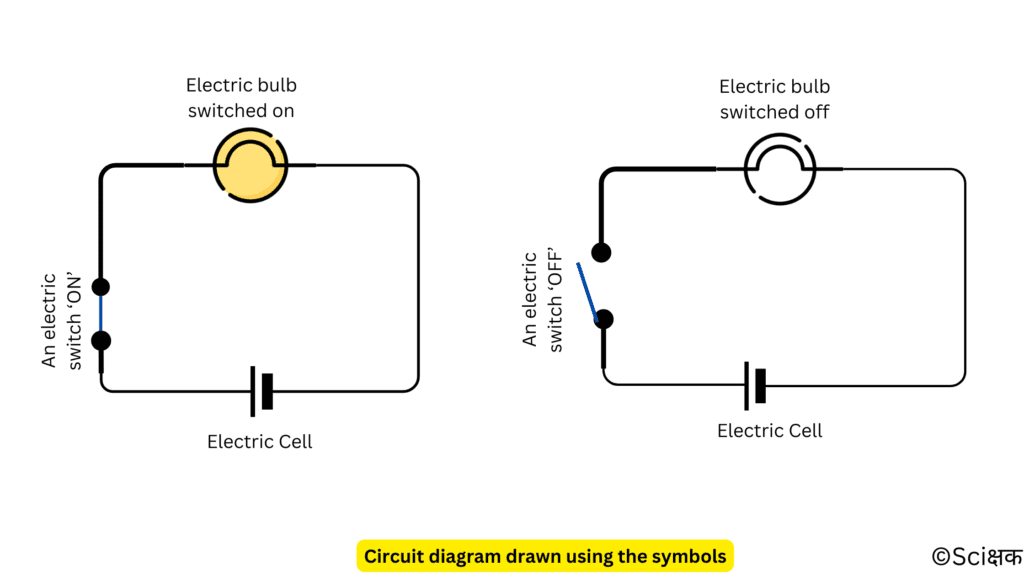
- The switch or the key can be placed anywhere in the circuit.
- When the switch is ON then the circuit from the positive terminal of the cell to the negative terminal of the cell is complete and the current starts to flow in the circuit lighting up the electric bulb. This type of circuit is called a closed circuit.
- But, when the switch is OFF then the circuit from the positive terminal of the cell to the negative terminal of the cell is incomplete not letting the current flow in the circuit. This type of circuit is called an open circuit.
FILAMENT:
It is a thin tungsten wire that is present inside an electric bulb which glows when an electric current passes through it.
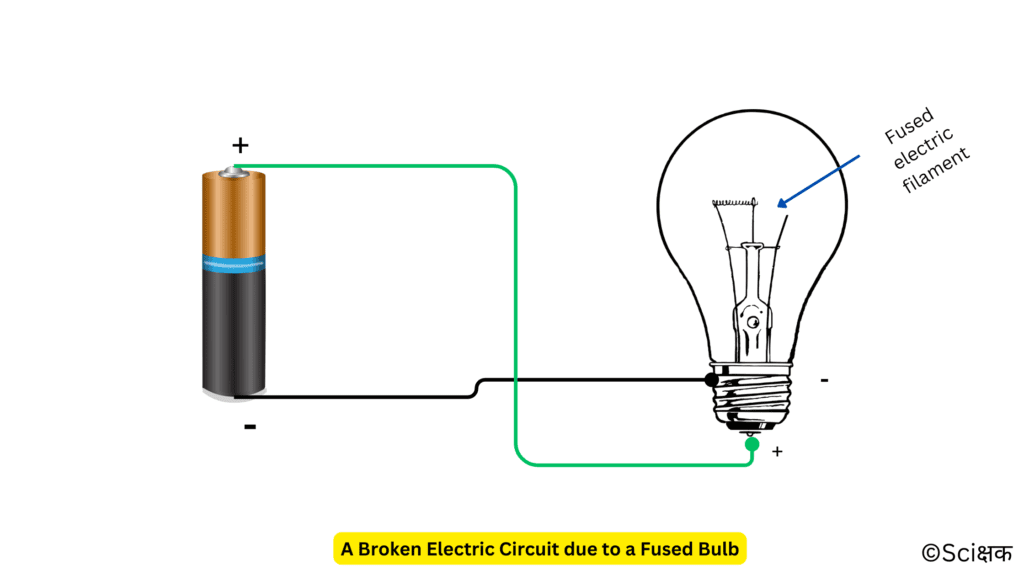
When the bulb gets fused, the filament is broken.
PRECAUTIONS:
- Never touch a lighted electric bulb connected to the mains/electricity because it may be very hot and your hand may get burnt.
- Don’t toy with the main electricity, generators or inverters because you can get electrocuted.
Heating Effect of Electric Current
From the precautions mentioned above, we know that an electric bulb may get hotter when electricity passes through it. Not only does the electric bulb get hot but the electric wires, and switches (any electric conductor in general) also get hot when an electric current passes through it.
The Above Video Demonstrates:
- A nichrome wire heats up when an electric current passes through it.
NICHROME: is an alloy (made from mixing metals like nickel, chromium and sometimes iron together) that heats up really quickly when an electric current passes through it and this is the heating effect of the electric current.
Various appliances work on this heating effect of the electric current:
- electric heater & geyser,
- electric iron,
- electric bulb,
- bread toaster,
- hair drier, etc.
All of these appliances contain a coil of wire called an element.
The amount of heat produced in a wire/element depends on various factors:
- nature of the material,
- length and thickness of the material, etc.
Thus, for different requirements, wires of different materials and different lengths and thicknesses are used.

The wires used for making the electric circuits don’t usually get hot and on the other hand, the elements of some electric appliances become so hot they are easily visible.
The filament of an electric bulb gets heated to such a high temperature that it starts glowing.
Alternatives to an incandescent electric bulb (Innovations & Inventions):
- The typical old type of electric bulbs are the incandescent bulbs which are often used for lightening but they also give heat (which means a part of the electricity got consumed in producing the heat). These bulbs are not electrically efficient because there is a waste of electricity.
- Fluorescent light tubes and compact fluorescent lamps (CFLs) are better electricity-efficient lighting sources.
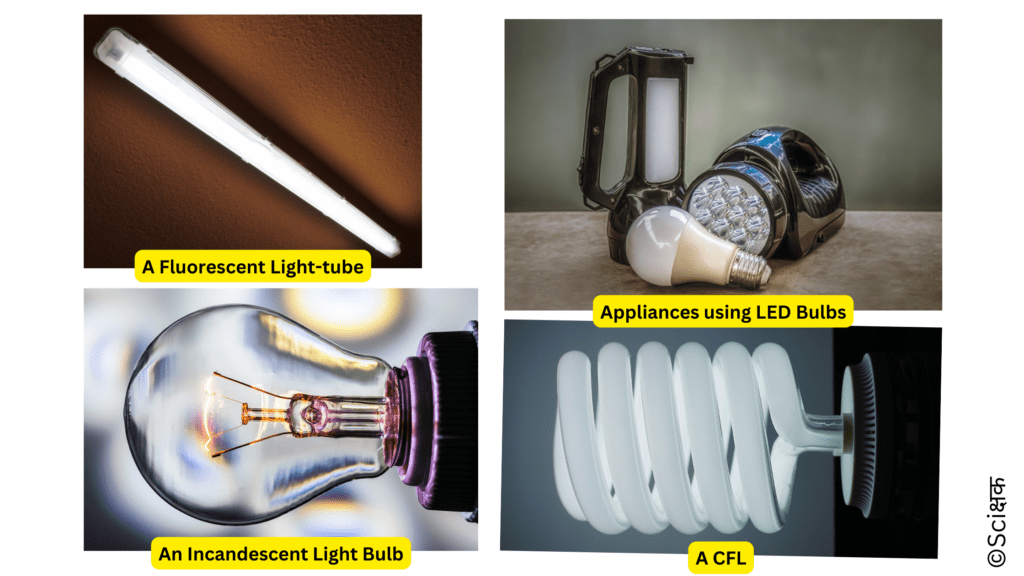
3. Nowadays, we have started to use LED ( Light Emitting Diode) bulbs as they are more electricity efficient than CFLs and incandescent bulbs.
ISI Mark:

BIS (Bureau of Indian Standards), New Delhi assigns a Standard Mark on products, called the ISI mark which is an assurance of conformity to the specifications given on the products. It is therefore suggested to use ISI mark products which are electricity efficient.
Note: Fluorescent tubes and CFLs contain mercury vapours which are toxic in nature. Therefore, damaged fluorescent tubes or CFLs need to be disposed of safely.
Electric Fuse
If a large amount of current passes through a wire it may become hot and can even melt as well.
There are some special materials (like steel wool, tin-lead alloy, etc.) whose wire melts quickly and breaks when a large amount of current passes through them. These special materials are used for making electric fuses.
An electric fuse is a safety device that prevents damage to electric circuits and possible fires.
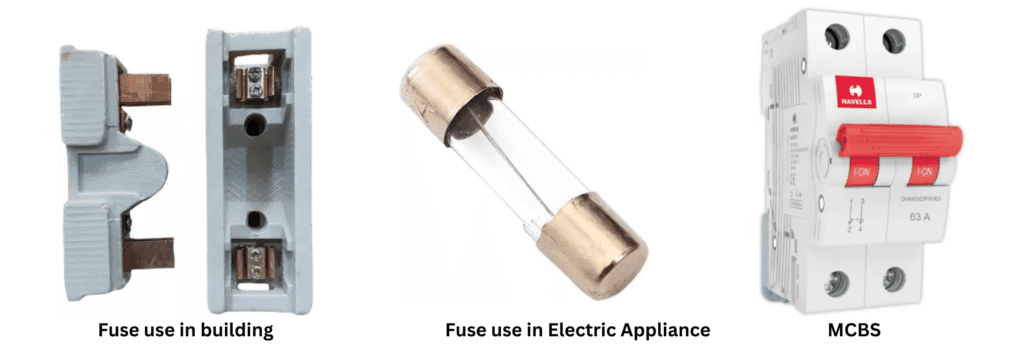
In all the buildings fuses are inserted in all electrical circuits. There is a maximum limit on the current which can safely flow through a circuit. If by accident the current exceeds this safe limit, the wires in the circuit overheat and may cause a fire. If there is a proper fuse in the circuit, it will blow off and break the circuit preventing any further damage to the circuit and possible fire.
Fuses of different kinds are used for different purposes.
MCBs (Minature Circuit Breakers):
These devices are like switches that automatically turn off when the current in a circuit
exceeds the safe limit.
You turn them on and the circuit is once again complete. So, they don’t need to be replaced every now and then after a power surge, unlike a typical fuse which gets blown off in case of a power surge and permanently breaking off the circuit.
PRECAUTIONS:
- Never try to investigate an electric fuse connected to the main circuit of your house on your own.
- Always use a proper fuse that has been specified for a particular application carrying an ISI mark on it.
- Never use just any wire or strip of metal in place of a fuse.
Magnetic Effect of Electric Current
In our 6th class, we learnt about magnets, their types, properties, compasses, etc. Well, if you are not able to recall all this then you can go through its notes whose link has been provided below:
A compass has a magnetised needle pointing in the north-south direction and when we bring a bar magnet (or any kind of magnet) near the compass its needle shows deflection.

There was this scientist named Hans Christian Ørsted, who noticed that when you place a compass near a current-carrying wire its needle shows deflection. He was quite intrigued by this occurrence.
Later, it was concluded that when electric current passes through a wire it behaves like a magnet. This is the magnetic effect of the electric current.
Electromagnets
These devices are based on the principle of the magnetic effect of the electric current.
Electromagnets (‘Electro’ means Electricity and Magnets) are the devices or temporary magnets that are created by the flow of the electric current through a material.
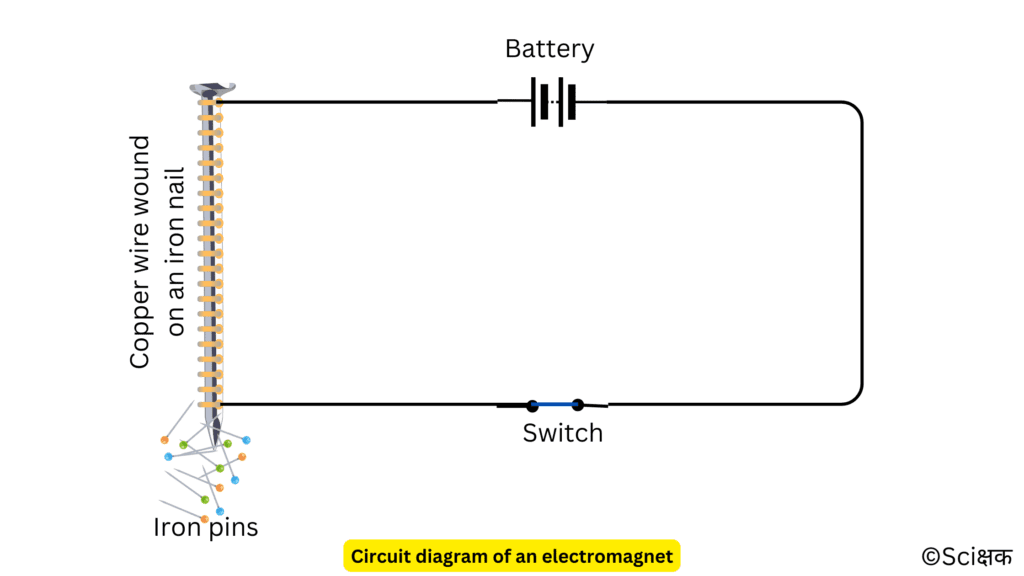
We can also create our own electromagnets at home:
- Take an iron nail & about 2 feet-long insulated copper wire.
- Wind the wire tightly around the nail in the form of a coil.
- Connect the free ends of the wire to an electric cell or battery through a switch.
- Place some iron pins and scraps near the end of the nail.
- Now, switch on the current and observe the moment of the iron pins and scraps.
- Iron pins & scraps will start to cling to the end of the nail and the moment you turn off the switch they all will drop down on the surface.
The coil in the above activity behaves like a magnet when electric current flows through it. It loses its magnetism the moment current stops to flow through it, such coils are called electromagnets.
Electromagnets have various applications:
- A strong electromagnet attached at one end of a crane is used for sorting the magnetic material from the junk (refer to chapter 10 of the 6th class) in the scrapyard.
- Doctors use tiny electromagnets to remove the small pieces of magnetic materials that have accidentally fallen in their patient’s eye(s).
- Many toys also use electromagnets, etc.
Electric Bell
This device also has an electromagnet in it.
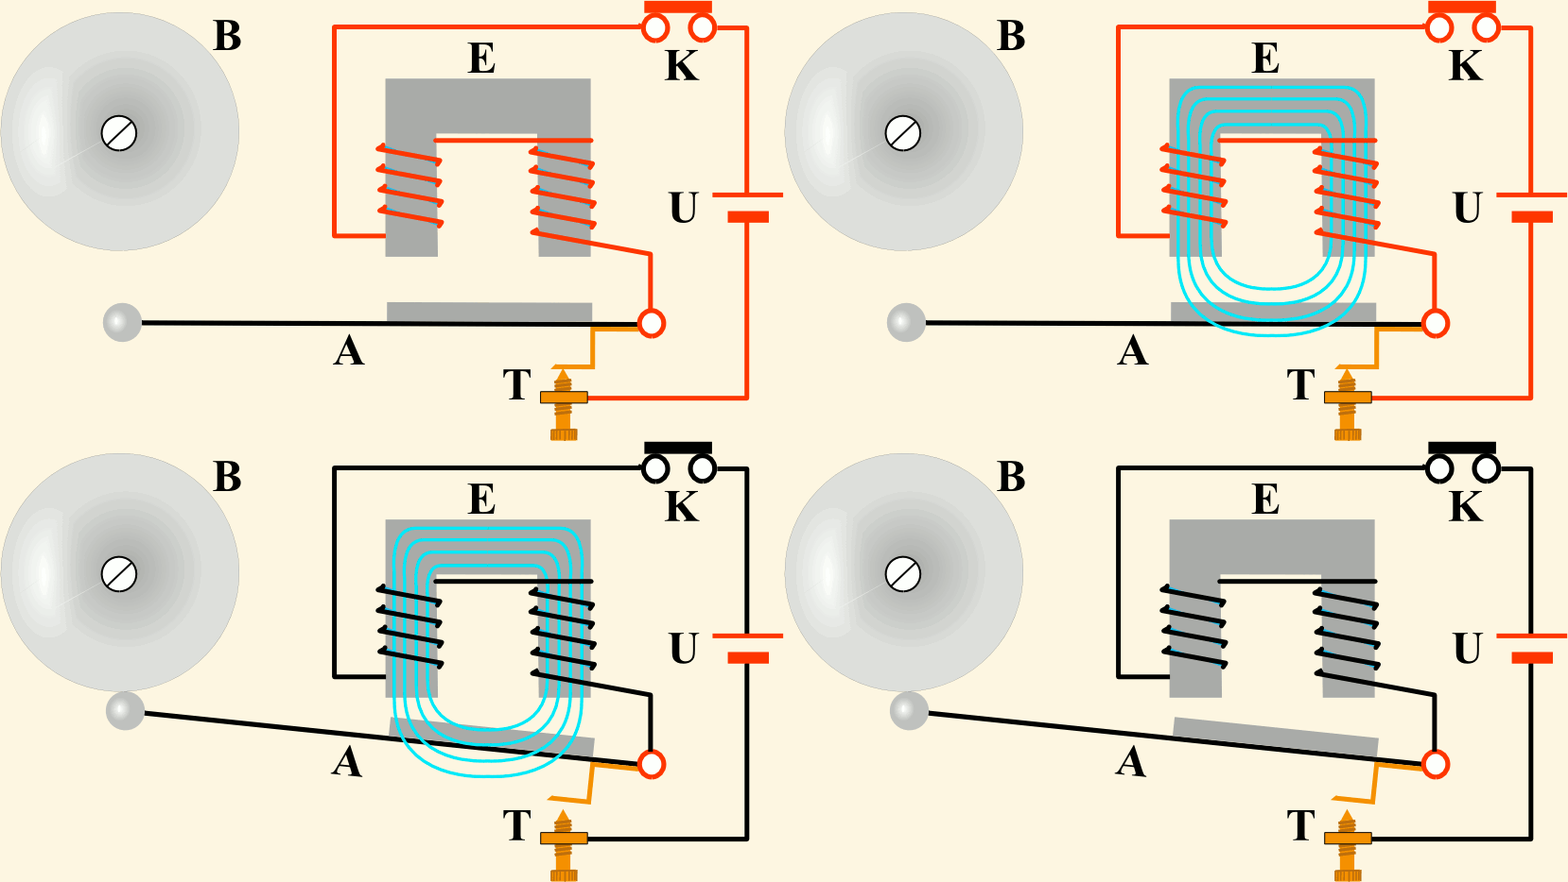
Construction of an electric bell:
- It consists of a wire wound on an iron piece (E) which acts as an electromagnet.
- An iron strip with a hammer (A) at one end is kept close to the electromagnet.
- There is a contact screw (T) near the iron strip.
- A gong bell (B), cell (U) and a switch/key (K).
Working of an electric bell:
- When the iron strip is in contact with the screw, the current flows through the coil which becomes an electromagnet.
- It then pulls the iron strip. In the process, the hammer at the end of the strip strikes the gong of the bell to produce a sound.
- However, when the electromagnet pulls the iron strip it breaks the circuit. So, the current stops flowing through the coil.
- The coil is no longer an electromagnet so, It no longer attracts the iron strip.
- The iron strip comes back to its original position and touches the contact screw again.
- This completes the circuit. The current flows in the coil and the hammer strikes the gong again.
- This process is repeated in quick succession.
The hammer strikes the gong every time the circuit is completed. And, this is how the bell rings.
Credits & References
- Class 7th Science NCERT Textbook
- Filament-lamp icons created by Freepik – Flaticon
- Image by Michal Jarmoluk from Pixabay
- Image by brgfx on Freepik
- Image by kalhh from Pixabay
- Image by Josch13 from Pixabay
- Image by Hans from Pixabay
- By Christian Albrecht Jensen – Farvereproduktioner efter 20 portrætter af berømte danske mænd (København 1943), Public Domain, https://commons.wikimedia.org/w/index.php?curid=33248971
- Image by LEEROY Agency from Pixabay
Thank You for Choosing Sciक्षक ❤️

